Showing posts with label XE3. Show all posts

February 23, 2013

High speed generic queue class


This article presents a generic class implementing a high speed queue. It has been specially designed for communication use but can be used for anything else.

Reading this article, you'll learn:
  • How to design a generic class
  • How to use nested data type
  • How to implement an enumerator
  • How to make a class thread safe
  • How to use variant record
  • How to use methods in a record
The code itself is quite short! Thanks to the efficient Delphi language.


High Performance

About high speed: Initially, I had an issue with performance in a communication system where a process was producing messages to be handled and another process was processing the messages. The two processes are totally asynchronous. I use the term "process" not to refer to different programs, but to different units of a single program.

The bottle neck was coming from memory allocation. Record where allocated by the producer process and freed by the processing processes. This resulted in a large amount of memory being allocated freed.

I designed this class to avoid as much as possible memory allocation. The design makes use of a several doubly linked lists of "buffers". The buffers are actually the data type specified by the generic type. Usually it is a record with a structure specific to the messages exchanged between the two process. If the application requires several types of buffers, then you should use a variant record to hold all types. We will see an example later.

High speed comes also from the fact that you don't copy data except when really forced to. To avoid copying data, we use pointers. Data stay where it is, we access it thru his address. The compiler takes care of the details for us.


Doubly linked list as a queue

A queue is a data structure in which you can append items (aka "node") at one end and remove items at the other end. This scheme is frequently named "First in - First out" or FIFO for short. You have another variant which append and remove items at the same end. That one is named LIFO which stands for "Last in - First out". In the application I described above, I need a FIFO queue.

FIFO queues can be implemented in a lot of different ways. Here I selected a doubly linked list because in my context this is the fastest way doing it.

A doubly linked list is a very classic data structure. Basically a doubly linked list is a variable number of items (or nodes) of any data type. One item is linked to the next using a pointer and linked to the previous using another pointer. There are two more separate pointers: one point to the first item and one point to the last item. To append items, we use the pointer to the last item and to remove items, we use the pointer to the first item.

You can find a lot of articles about it everywhere on the internet. So I will only describe what make my implementation specific.


High performance revisited

Now that we have a doubly linked list in hand, we will use it to achieve high performance. We will use 3 linked lists to avoid memory allocation:
  • Linked list of active items
  • Linked list of inactive items
  • Linked list of acquired items
Active items are those referring to the items added to the queue and not removed yet from the queue. They are actively waiting to be processed.

Inactive items are those having already be processed. Instead of freeing the processed items, we put it in the inactive queue where they are waiting for reuse. When a new active item has to be created, before allocating one new item, the inactive linked list is checked and if not empty, an item is removed from the list and reused, that is moved to the end of the active list. If the inactive list is empty, then a new item is allocated. This has a tremendous impact on the performance: adding a large number of items take 30 mS the first time when they need to be allocated. Later, when they can be reused, it only takes 17 mS!

Finally, the acquired items linked list is used when there are several processes consuming the same queue. For example when we have a multithread application and several threads are fetching messages from the same active queue. The third list is used to store one item extracted from the active list while it is processed so that another thread won't take the same item. After it has been processed, the "acquired" item is moved to the inactive list using a method I named Release.

Generic class use

A generic class is a class which has a variable part not known when designing the class. In our case, the variable part is a record. I named the generic class TCommQueue.

To use TCommQueue, you have to declare a record type and a variable. Let's assume the record type is:

  TCommFrame = packed record
    Name : array [0..50] of Char;
    Size : Integer;
  end;

This is a totally arbitrary record made simple for this article. In a real application, this record will be much more complex with all the members required for your application.

The variable representing the queue is declared as follow:

    FQueue : TCommQueue<TCommFrame>;

It is probably a member variable of a form in your application or in a component, data module or whatever you need. It doesn't matters in fact. TCommQueue inherit from TObject so before use, you must create it and after use you must free it. In most applications, you will do that in the constructor and destructor of your form, data module or component. A more complete source code is as follow:


type
    TForm1 = class(TForm)   
    protected
        FQueue : TCommQueue<TCommFrame>;
    public
        constructor Create(OAwner: TComponent); override;
        destructor Destroy; override
    end;

implementation

constructor TForm1.Create(AOwner : TComponent);
begin
    inherited;
    FQueue := TCommQueue<TCommFrame>.Create;
end;

destructor TForm1.Destroy;
begin
    FreeAndNil(FQueue);
    inherited;
end;

You see that using a generic type is very easy: you use the generic type name (TCommQueue here) and append your own data type in angle brackets ( here).

The compiler will compile the generic class by replacing the parameter type with the one you supplied.


Generic class declared

Now it's time to see the declaration of TCommQueue generic class. Remember we are using doubly linked list which are defined here as nested data type.

Nested data types have been introduced with Delphi XE3. See online help at http://docwiki.embarcadero.com/RADStudio/XE3/en/Nested_Type_Declarations

Nested data types are not related to generics, but are very handy in that case because nested data types within a generic class may make use on the parameter data type.

type
    // Forward declarations
    TCommQueue<T : record>     = class;
    TCommQueueEnum<T : record> = class;

    TInitCallBack = procedure (Sender : TObject;
                               Item   : Pointer) of object;

    TCommQueue<T : record> = class(TObject)
    // This nested type actually defines a doubly linked list of <T>
    type
        TItemPtr = ^T;          // Pointer to <T>
        PLLNode  = ^TLLNode;    // Pointer to a linked list node
        TLLNode  = record       // Doubly linked list cell
            Item : T;           // Item /must/ be the first node member
            Next : PLLNode;     // Pointer to the next node
            Prev : PLLNode;     // Pointer to the previous node
        end;
        TLinkedList = record    // Doubly linked list
            First : PLLNode;    // Pointer to the first node in the list
            Last  : PLLNode;    // Pointer to the last node in the list
            Count : Integer;    // Number of nodes in the list
            procedure Add(Item : PLLNode);
            function  ExtractLast : PLLNode;
            procedure Extract(Item : PLLNode);
            procedure FreeAllItems; inline;
        end;
    protected
        FActiveList   : TLinkedList;      // List of active items
        FInactiveList : TLinkedList;      // List of inactive items
        FAcquiredList : TLinkedList;      // List of acquired items
        FCurrent      : TItemPtr;         // The current item
        FCritSection  : TCriticalSection; // For multithread support
        // Enum is called back from the enumerator class
        // Give an item pointer, it returns the next item pointer or nil
        function  Enum(Item : Pointer) : Pointer;
        // GetItem is called back from the enumerator class
        // Get an item from the list. The item is COPYED while all other
        // functions make use of pointers.
        function  GetItem(ItemPt : Pointer) : T;
    public
        constructor Create;
        destructor Destroy; override;
        // Required method to supprt for..in contruct (not thread safe)
        function  GetEnumerator : TCommQueueEnum;
        // Add a new item, reusing an old one of any and return a pointer to it
        function  Add : TItemPtr;
        function  Add(InitCallBack : TInitCallBack) : TItemPtr; overload;
        // Remove an item and return pointer to the next
        // Current is not affected unless it is the one removed
        function  Remove(Item : TItemPtr) : TItemPtr; overload;
        // Remove current item and return a pointer to the next
        // The current becomes the next
        function  Remove : TItemPtr; overload;
        // Return pointer to first item. Update current.
        function  First : TItemPtr;
        // Return pointer to last item. Update current.
        function  Last : TItemPtr;
        // Return pointer to next item. Update current.
        function  Next : TItemPtr; overload;
        // Return a pointer to the item after a given one. Update current.
        function  Next(Item : TItemPtr) : TItemPtr; overload;
        // Return pointer to previous item. Update current.
        function  Previous : TItemPtr; overload;
        // Return a pointer to the item before a given one. Update current.
        function  Previous(Item : TItemPtr) : TItemPtr; overload;
        // Acquire the first item, if any and remove it from the list
        // it must be later be released by calling ReleaseItem
        // Acquire Item doesn't affect current unless it is the one acquired
        function  AcquireItem : TItemPtr;
        // Release an item previously acuired. The item is moved to the
        // inactive list for later reuse
        procedure ReleaseItem(Item : TItemPtr);
        // Free all items in the inactive List
        procedure FreeAllInactiveItems;

        property Current       : TItemPtr      read FCurrent;
        property Count         : Integer       read FActiveList.Count;
        property CountInactive : Integer       read FInactiveList.Count;
        property CountAcquired : Integer       read FAcquiredList.Count;
    end;

    // Class to support for..in construct with the main TCommQueue<T> class
    // Warning: for..in is not really thread safe
    TCommQueueEnum<T : Record> = class
    protected
        FQueue : TCommQueue<T>;
        FIndex : Pointer;
    public
        constructor Create(AQueue : TCommQueue<T>);
        function GetCurrent: T;
        function MoveNext: Boolean;
        property Current: T read GetCurrent;
    end;


The generic class TCommQueue takes one parameter which is the data type you want to use for the items. Instead of I could have used. The difference is that the later allow any data type to be used for T while specifying "record" impose the constraint of have a non nullable data type, mostly a record but also a scalar type such as integer, char and the likes. You cannot use string, array, class nor interface. I imposed such restriction because memory is allocated/freed using new/dispose.

The doubly linked list is declared as a nested data type at line 19. It is a record named TLinkedList. It contains two pointers to each end of the linked list, and a count of items in the list. I added a count because counting elements in a linked list is expensive: you have to iterate thru entire list to count how many node it has. Maintaining a counter is a useful optimization which doesn't cost much.

The nodes or items of the linked list are made of a record named TLLNode defined. As you can see at line 15, it makes use of the parameter type to build the record. Remember, in a doubly linked list, a node is made of the actual data you want in the list plus two pointers to the next and previous node in the list.

Lines 23 to 26 are method declarations for the record. Their implementation handles adding (append) or extracting (remove) nodes. This is only a matter of manipulation the pointers, no data is actually allocated, moved nor freed. This is really fast!

At line 29, 30 and 31 are declared the 3 doubly linked lists we talked before. Since TLinkedList are records, there is no need to allocate/free memory.

Line 31 declares FCurrent a pointer to an item. It is used in conjunction with the methods First, Next, Previous and Last that I implemented to iterate thru the list. Please note that those are NOT thread safe.

For the fun, I implemented an enumerator for the queue. Please refer to my article "Writing an iterator for a container" for details: http://francois-piette.blogspot.be/2012/12/writing-iterator-for-container.html
The enumerator is NOT thread safe and copies the data which is bad for performance.

The real interesting stuff is in methods Add, AcquireItem and ReleaseItem. They are all fully thread safe.

Add will add an item to the queue (Active linked list), reusing an inactive one or allocating a new item. Add returns a pointer to the item. There are two overloaded versions of method add. One without argument and one with a method pointer argument.

The version with the method pointer argument (line 48) is required to be fully thread safe. Allocating a new item in the queue may require initialization of the item. But initialization must take place before the item is visible in the queue otherwise another thread could remove it before it is initialized. The method pointer passed as argument is used as a callback (a kind of event if you like) which will be called within add method just after the new item is allocated or extracted from inactive list and just before it is actually appended to the active list.

A last note about multithreading: we handle linked list pointers in the implementation. To be thread safe, the handling must make sure only one thread at a time can update any of the linked lists. This is why I used a critical section declared at line 33.


Implementation

The implementation is rather boring. It is actually very basic Delphi programming. I give the source below to be complete. Drop a message if you need some more explanations.
Complete source code is available at http://www.overbyte.be/eng/blog_source_code.html


Follow me on Twitter
Follow me on LinkedIn
Follow me on Google+
Visit my website: http://www.overbyte.be

The article is available at:
     http://francois-piette.blogspot.com/2013/02/high-speed-generic-queue-class.html

February 14, 2013

Delphi's 18th birthday


Today is Delphi's 18th birthday. Delphi 1 started on February 14, 1995. I started to use it a little bit later and I'm still using it every day. I never regretted that decision.

In 1995, Delphi was an extraordinary development tool and it is still today an extraordinary one in its latest incarnation: Delphi XE3.

After 64 bits, Windows 8 and MAC OS X Lion, now Delphi goes mobile: http://www.embarcadero.com/products/delphi/ios-development


February 10, 2013

Using Universal Plug And Play (UPnP) with Delphi


UPnP is a set of networking protocols that allows discovery of networked devices supporting UPnP. For example, you can easily discover printers, Wi-Fi access points, internet gateways, Streaming servers and many other types of devices.

Microsoft Windows provides an API to use UPnP. This API is located in a DLL which basically exposes a COM interface. You’ll find the documentation on Microsoft MSDN website http://msdn.microsoft.com/en-us/library/windows/desktop/aa382303(v=vs.85).aspx.

UPnP API is not complex to use but, of course, is not written the “Delphi way”. This is why I wrote a Delphi layer above the API to ease its use.

I created an object TNetworkDeviceFinder which implement the call back functions that Microsoft API requires to discover UPnP devices connected on the network and expose the result as a set of properties and a single event.

To get an abstraction level, I had the choice to write a component or an interface. I selected to implement it as an interface. Basically you may use my TNetworkDeviceFinder object as a simple Delphi object or as an interface. The later is easier.

I wrote a complete demo application available from my website at http://www.overbyte.be/eng/blog_source_code.html. You can download full source code so I will only show here some significant portions. The demo application is interesting not only for his UPnP usage, but also as a model for a real application. It has those features:
  • Search for a UPnP device on the network using many criteria
  • List all UPnP devices on the network
  • Have his data persistent
  • Have if form position and size persistent
  • Store the INI file in Local/AppData folder (Win7 friendly)

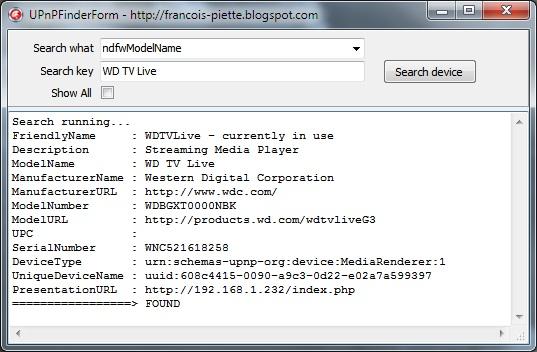
The demo application in action looks like this:


On this screen dump, you see the result of the search for “WD TV Live” on the network. As you can see in the result, this is a Western Digital streaming media player. The search has been done by model name. The combobox allows you to search by all other datas.

Once you have discovered the device, you have at hand a lot of informations. For example, you have the PresentationURL which you can use to manage the device. You get the IP which can be used to access the streaming function.

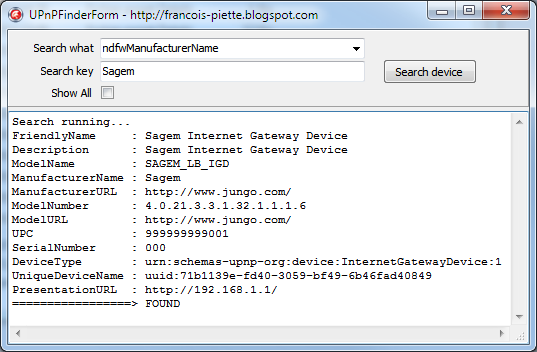
Another example: Here I searched for “Sagem” in manufacturer name. The result is related to my internet router. You can use the resulting PresentationURL to have the IP address and later use it to open a port for NAT traversal.


There are countless applications…

All this is very easy using the TNetworkDeviceFinder object Id designed. Here are the stepas:

  1. Add UPnPFinder unit in the uses clause
  2. Declare a variable in the protected section:
FNetworkDeviceFinder : INetworkDeviceFinder;


  1. Initialize the variable, for example in the FormCreate event:
FNetworkDeviceFinder := TNetworkDeviceFinder.Create;


  1. Assign the event handler which is called when a device is found:
FNetworkDeviceFinder.OnSearchResult := SearchResultHandler;


  1. Write the handler for the event:
procedure TUPnPFinderDemoForm.SearchResultHandler(
Sender : TObject;
State : TSearchResultState;
var CancelFlag : Boolean);
begin
if State = srsNotFound then
Memo1.Lines.Add(FNetworkDeviceFinder?PresentationURL);
end;


  1. Start the search, for example from a ButtonClick event:
FNetworkDeviceFinder.StartSearchAsync(ndfwModelName, 'Sagem');


  1. When you don’t need the feature anymore, for example in the FormDestroy, cancel any pending search and free the interface:
if Assigned(FNetworkDeviceFinder) then begin
FNetworkDeviceFinder.CancelSearchAsync;
FNetworkDeviceFinder := nil;
end;

That’s it! You will find complete source code for the demo and the object at my website: http://www.overbyte.be/frame_index.html?redirTo=/blog_source_code.html
This article is located at:
http://francois-piette.blogspot.be/2013/02/using-universal-plug-and-play-upnp-with.html

If you like this article, please share it!
Follow me on Twitter


January 31, 2013

Internet Explorer Automation Part 2


Internet Explorer is a very nice program to automate. There are a large number of actions you can do programmatically from your own application. But when IE is already opened with a bunch of tabs, it is not a trivial task to programmatically select and activate the tab you want.

Here after, I will present all the code required to do that. It has been developed using Delphi XE3 but of course as automating IE is independent of the language, you should be able to translate my code to C#, C++ or any language supporting COM programming.

The code I present is basically in a single function with a number of small supporting functions. The main function is:

function WebBrowserSelectTabByUrl(
    const Wb           : IWebBrowser2;
    const Url          : String;
    out   HwndTopLevel : HWND) : Boolean;


You pass an existing IWebBrowser interface (see for example my previous article at http://francois-piette.blogspot.com/2013/01/internet-explorer-automation-part-1.html) and an URL. The function will select the tab having the given URL loaded, if any. It will also return a window handle that can be used to bring the actual window in the foreground or to restore it if it was minimized.

To achieve his goal, WebBrowserSelectTabByUrl is using a seldom know interface. I mean IAccessible (http://msdn.microsoft.com/en-us/library/windows/desktop/dd318466(v=vs.85).aspx). This interface is normally used by software written for the visual impaired person. This kind of software is able to discover almost every interface gadget on screen, return a description and perform a default action such as clicking on it if it is a button.

Internet Explorer is exposing a complete IAccessible interface for its entire user interface. And this is what I use to search for the tab rows displaying IE tabs, and get the URL assigned to each of the tab.

IAccessible interface and related definitions is defined in OleAcc unit which is an import from OLEACC.DLL type library. This unit also contains a lot of constants that were not included in the type library.

Beside the interface, there are a few API functions which give an IAccessible interface from a window handle or the reverse. We need two functions which are not defined in OleAcc and you’ll find the required import in the code at the end of this article. It is WindowFromAccessibleObject and AccessibleChildren.

IAccessible is just the programmatic way to interact with the underlying user interface gadgets. It is organized in an hierarchical tree. One you get an IAccessible interface for something, you can “travel” thru the tree to find what you need. Each gadget has a name. We are looking for “Tab Row” item. In Internet Explorer user interface, this represents the row usually below the address bar, where IE shows all tabs for all opened URL.

Once we get hand on the “Tab Row” gadget, we can iterate all of its descendants to find the one with the URL we are looking for. The URL is associated with each tab as a description. Actually the tab description is composed of the text IE show on the tab and the associated URL that IE shows in the address bar when the tab is selected.

Finally, when we have the IAccessible for the exact tab were looking for, we can invoke his default action programmatically. The net effect is the same as the effect a user produce when clicking on the tab.

There is still an issue: As IAccessible is made to help visually impaired users, the name of each gadget is localized. So “Tab Row” in English becomes “Onglet Ligne” in French! I have not found any way to discover the translation so I have to code a small routine querying the language from Windows configuration and use it to select the correct translation. If you use my code, you must add the language you need because I only programmed the English and French translation. See WebBrowserGetLocalizedTabRowName function at the end of this article. [The translation is probably somewhere in one resource in IE executable or DLL. Let me know if you know where it is]

The fastest way to find the first IAccessible interface we need is to travel Internet Explorer window tree. I used Microsoft Spy++ tool to see how those windows are organized. The outermost window handle is given my IWebBrowser interface in his HWND property. Then the hierarchy of window classes is “WorkerW” (or “CommandBarClass” depending on IE version), “ReBarWindow32”, “TabBandClass” and finally “DirectUIHWND”. In used the API function FindWindowEx to navigate thru the hierarchy. Yhe result is the functions WebBrowserGetDirectUIHWND.

From the DirectUIHwnd, we can get the IAccessible interface calling AccessibleObjectFromWindow. Let’s name it AccDirectUI.

The, as I said above, we have to traverse the IAccessible tree to find one with name “Tab Row” (Or the translated is you don’t use an English IE). This is FindAccessibleDescendantByName function. This is a classical tree traversal algorithm. The only complex thing is that there is a variant in the process. A cast and a call to QueryInterface are required to get hand on the IAccessible interface of the child.

Almost the same tree traversal is used from the “Tab Row” to find the right tab. Instead of checking the name, I check the description which contain the URL.

Enough story, here is the code:

function WebBrowserSelectTabByUrl(
  const Wb           : IWebBrowser2;
  const Url          : String;
  out   HwndTopLevel : HWND) : Boolean;
var
  HwndDirectUI     : HWND;
  AccDirectUI      : IAccessible;
  TabRow           : IAccessible;
  CandidateTab     : IAccessible;
  I                : Integer;
  LocalUrl         : String;
  HwndCandidateTab : HWND;
  ChildArray       : array of OleVariant;
  ChildDispatch    : IDispatch;
  ChildCount       : Integer;
  CountObtained    : Integer;
begin
  Result       := FALSE;
  HwndDirectUI := WebBrowserGetDirectUIHWND(Wb);
  AccessibleObjectFromWindow(HwndDirectUI, OBJID_WINDOW,
                             IID_IAccessible, AccDirectUI);
  if not Assigned(AccDirectUI) then
    Exit;

  TabRow := FindAccessibleDescendantByName(AccDirectUI, 

                           WebBrowserGetLocalizedTabRowName);
  TabRow.Get_accChildCount(ChildCount);
  if ChildCount <= 0 then
    Exit;
  SetLength(ChildArray, ChildCount);
  if AccessibleChildren(Pointer(TabRow), 0, ChildCount,

                        ChildArray[0], CountObtained) <> S_OK then
    Exit;
  for I := 0 to CountObtained - 1 do begin
    if VarType(ChildArray[i]) = varDispatch then begin
      ChildDispatch := TVarData(ChildArray[i]).VDispatch;
      if (ChildDispatch <> nil) and
         (ChildDispatch.QueryInterface(Ole2.TGUID(IID_IAccessible),

                   CandidateTab) = S_OK) then begin
        if not Assigned(CandidateTab) then
          continue;
        LocalUrl := WebBrowserUrlForTab(CandidateTab);
        if SameText(LocalUrl, Url) then begin
          CandidateTab.accDoDefaultAction(0);
          WindowFromAccessibleObject(CandidateTab, HwndCandidateTab);
          HwndTopLevel := FindIEFrameWnd(HwndCandidateTab);
          Result := TRUE;
          Exit;
        end;
      end;
    end;
  end;
end;


function WebBrowserUrlForTab(AccTab : IAccessible) : String;
var
  Desc : WideString;
  I    : Integer;
begin
  try
    SetLength(Desc, 1024);
    AccTab.Get_accDescription(CHILDID_SELF , Desc);
    if Desc <> '' then begin
      I := Pos(String(#13#10), String(Desc));
      if I > 1 then
        Result := Copy(Desc, I + 2, MAXINT)
      else
        Result := Desc;
      Exit;
    end;
  except

    Result := '??';
  end;
end;


// The IAccessible name for the tab row in Internet explorer is localized
// This function fetch the language code and return the appropriate value
// according to the current system default language
function WebBrowserGetLocalizedTabRowName : String;
var
  Lang : String;
begin
  Lang := GetLocaleStr(LOCALE_SYSTEM_DEFAULT, LOCALE_SISO639LANGNAME, '');
  if Lang = 'fr' then
    Result := 'Onglet Ligne'
    // YOU MUST ADD a "else if" clause for each language you want to support
  else
    Result := 'Tab Row'; // English
end;

function WebBrowserGetDirectUIHWND(Wb : IWebBrowser2): HWND;
begin
  // try IE 9 first:
  Result := FindWindowEx(Wb.HWND, 0, 'WorkerW', nil);
  if Result = 0 then begin
    // IE8 and IE7
    Result := FindWindowEx(Wb.HWND, 0, 'CommandBarClass', nil);
  end;
  Result := FindWindowEx(Result, 0, 'ReBarWindow32', nil);
  Result := FindWindowEx(Result, 0, 'TabBandClass', nil);
  Result := FindWindowEx(Result, 0, 'DirectUIHWND', nil);
end;


// Recursively trave the tree of descendant IAccessible interface object
// to search for the one having a given name.
function FindAccessibleDescendantByName(
  const AParent : IAccessible;
  const AName   : String) : IAccessible;
var
  ChildArray    : array of OleVariant;
  Child         : IAccessible;
  ChildName     : WideString;
  ChildDispatch : IDispatch;
  ChildCount    : Integer;
  CountObtained : Integer;
  I             : Integer;
begin
  Result := nil;
  Aparent.Get_accChildCount(ChildCount);
  if ChildCount <= 0 then
    Exit;
  SetLength(ChildArray, ChildCount);
  if AccessibleChildren(Pointer(AParent), 0, ChildCount,

                        ChildArray[0], CountObtained) <> S_OK then
    Exit;
  for I := 0 to CountObtained - 1 do begin
    if VarType(ChildArray[i]) = varDispatch then begin
      ChildDispatch := TVarData(ChildArray[i]).VDispatch;
      if (ChildDispatch <> nil) and
         (ChildDispatch.QueryInterface(Ole2.TGUID(IID_IAccessible),

                                       Child) = S_OK) then begin
        if not Assigned(Child) then
          continue;
        Child.Get_accName(0, ChildName);
        if SameText(AName , ChildName) then begin
          Result := Child;
          Exit;
        end;
        Result := FindAccessibleDescendantByName(Child, AName);
        if Assigned(Result) then
          Exit;
      end;
    end;
  end;
end;


// Given a HWND for a window deep in the hierarchy of windows, go back to
// the top level window which has the class name 'IEFrame'.
function FindIEFrameWnd(Hndl : HWND) : HWND;
var
    H     : HWND;
begin
    H := Hndl;
    while TRUE do begin
        if SameText(GetClassName(H), 'IEFrame') then begin
            Result := H;
            Exit;
        end;
        H := GetParent(H);
    end;
end;


function WindowFromAccessibleObject(

             pAcc      : IACCESSIBLE;
             var phwnd : HWND) : HRESULT; stdcall;
             external 'oleacc.dll';

function AccessibleChildren(

             paccContainer     : Pointer;
             iChildStart       : LongInt;
             cChildren         : LongInt;
             out rgvarChildren : OleVariant;
             out pcObtained    : LongInt) : HRESULT; stdcall;
             external 'oleacc.dll';


The first part of this article is at:
   http://francois-piette.blogspot.be/2013/01/internet-explorer-automation-part-1.html

This article is at:
   http://francois-piette.blogspot.be/2013/01/internet-explorer-automation-part-2.html

Follow me on Twitter

January 28, 2013

Internet Explorer Automation Part 1


Internet Explorer can be automated just like Word or Excel. Most automation is done using IWebBrowser2 interface. Getting hand on a IWebBrowser interface is easy. It is enough to call CreateComObject, passing the Internet Explorer ID. This will create a new instance of Internet Explorer:

FWebBrowser := CreateComObject(CLASS_InternetExplorer) as IWebBrowser2;

Once the instance is created (A new IE window will open), we can call for example the Navigate method to load a page:


FWebBrowser.Navigate('http://www.overbyte.be', EmptyParam,
                     EmptyParam, EmptyParam, EmptyParam);

Sometimes, we do not need a new Internet Explorer Window but access an existing window to automate some processing on that window.

There exists several ways of finding an existing Internet Explorer window. One of the easiest is to use the Windows Explorer API. There is a bunch of interfaces to work with Windows Explorer. IShellWindows handle a collection of Explorer windows and this is exactly what we need. We will iterate thru all the windows and locate the Internet Explorer. Since there can be several IE opened windows, we will use the URL to find the one we are looking for.

Here is the code:

function GetIERunningInstanceByUrl(const Url : String): IWebBrowser2;
var
    ShWindows : IShellWindows;
    I         : Integer;
begin
    ShWindows := CoShellWindows.Create;
    for I := 0 to ShWindows.Count - 1 do begin
        Result := ShWindows.Item(I) as IWebBrowser2;
        if Assigned(Result) then begin
            if SameText(GetClassName(Result.HWND), 'IEFrame') then begin
                if SameText(Url, Result.LocationURL) then
                    Exit;
            end;
        end;
    end;
    // Not found
    Result := nil;
end;


GetClassName is a simple wrapper around Windows API to make it easier to use with Delphi:

function GetClassName(Hndl : HWND) : String;
var
    L : Integer;
begin
    SetLength(Result, MAX_PATH * SizeOf(Char));
    L := WinApi.Windows.GetClassName(Hndl, PChar(Result), Length(Result));
    SetLength(Result, L);
end;


Share this article if you like it!


http://francois-piette.blogspot.com/2013/01/internet-explorer-automation-part-1.html

See aldo the second part:
    http://francois-piette.blogspot.be/2013/01/internet-explorer-automation-part-2.html

January 26, 2013

Microsoft Word or Excel calls a Delphi application

 
This tutorial shows how you can have a Microsoft Office (Word, Excel,…) call your Delphi application. For the demonstration, I will use Word. From Word, a macro will call my Delphi application which will prompt the user for some data which will be inserted in the Word document.
 
In the real world, it is likely that your Delphi application will be a large application managing enterprise data. Calling it from Word or Excel will use existing function to fetch data and return it back to Word or Excel.
 
In this tutorial, we will: 
  • Create a simple automatable Delphi application
  • Create a Word VBA macro invoking the automatable Delphi application to get data and insert it in the document.
 
To build this tutorial I used Delphi XE3 and Word 2010. You can apply the same features using other Delphi or Word versions. Details may vary slightly with different versions but globally it remains the same.


Automatable Delphi application

 
Let’s create an automatable Delphi application!
 
Launch Delphi and create a new “VCL Forms Application” (File / New / VCL Forms Application – Delphi).


Save the application: Do Menu / File / Save project, name the main form unit “DelphiAppMain.pas” and the project file “DelphiApp.dproj”. Compile and run just to check everything is OK.
 
To make the application automatable, we need to add an “Automation object”. Do Menu / File / Other. Select Delphi projects / ActiveX on the left and select “Automation Object” on the right.


Click OK. On the next form, fill the fields as shown in this screen capture:


CoClass name “DataInterface” will be used in the VBA code we will see in a moment.
Description is anything you like to describe your application.
Threading model and Instancing will instruct the Windows COM engine about how to handle request. Using “single” and “Single instance” will make your application run automatically for each request. This may not be the best choice in all cases, but for now, it is the simplest and working choice suitable for this simple application.
 
Click OK to save your changes. This will create three files:
  • DelphiApp.ridl (A type library source file)
  • DelphiApp_TLB.pas (The type library imported into Delphi code)
  • Unit1.pas (A class to implement the interfaces declared in the type library)
In the project manager (Ctrl+Alt+F11 if it is not displayed), you see the files in our project:
 
 
In the main window, where you normally see your code, you should now see the “type library editor”. If yoy don’t see it, do Menu / View / Type Library.
Right click on IDataInterface branch on the treeview. Click on “New” and select “Method”:
 
 
Change the name to “ReadData”:

 
“ReadData” is the name of the function we will call from VBA macro. Now we need to create and describe the arguments and return value. Since we intent to ask the user some data, we will pass two arguments and have a return value:
  • A string to prompt the user
  • A reference to a string to return the data
  • Return value will be an integer
In the type library editor, there is a tab with parameters. There is button to add or delete parameters.
 
Data type deserve a little bit of explanations. Since OLE / COM / ActiveX is independent of the language, the data types are not only limited to a subset of what Delphi can handle, but their names is somewhat different than what Delphi uses. To make a long discussion short, here we need string and integer. Strings are named “BSTR” and integers are named “int”. We have in and/or out parameters. For “out” parameters, we must use a pointer. A pointer is specified by appending a start to the type name. So “int*” correspond to Delphi ^integer (A pointer to an integer).
 
The return value, as seen from VBA code, is an “out” parameter marked as “retval”. Do not confuse this return value with “return type” which should always be HRESULT is merely describe a low level API return value and type we don’t really care here.
 
With that knowledge, fill in the type library as the screen dump below shows:
 
 
Once the screen is as shown, click on the “Refresh implementation” tool button.
 
Click on the “Save All” button in Delphi main tool bar. This will prompt you for the implementation unit name currently named “unit1”. Name it “DelphiAppComInterface.pas”. You are also prompted for the type library file. Name it “DelphiApp_TLB.pas”.
 
Click on the DelphiAppComInterface tab to have a look at the source code which has been generated for you. You should see a single class named TDataInterface with a single method named ReadAdata, taking two WideString parameters Prompt and Value. The first is “const” , the second is “var”. This correspond to the “[in]” and “[in, out]” modifiers we used in the type library editor. The return value is of type SYSINT which is an alias of “integer”.
 
Here is the code:
 
Now we have to fill the gap and write the implementation code:
 
 
To use “InputQuery”, add “Dialogs” into the uses clause. ReadData, in my mind, is made to return a kind of error code. In a real application, you would query the data from some data source which might trigger several error conditions. ReadData should map those conditions to error codes and return it. Here in this tutorial, we just return 0 if OK and 1 as a single error code saying “not OK”.
 
We can compile and run the application which will just… do nothing!
 
Technically, the automatable application is an out of process COM object as Microsoft names it. Delphi runtime has everything required to build such a beast and this is exactly what we have done so far. Well, we just instructed Delphi to generate all the code except a single line…
 
As we wrote it, the application only responds when invoked from the outside via a COM interface. As it is now, that COM interface already exists but is almost unusable unless it is registered in Windows registry so that other applications can locate it, learn which interfaces are defined and call one of the interfaces methods.
 

Registering the application

 
COM object must be registered Windows registry. We don’t need to know all the complexity involved in that registration since Delphi runtime provides a method for doing exactly that.
 
When you build an application containing an automation object, Delphi runtime silently add command line argument processing to register and unregister your application in the OLE registry keys.
 
You need administrator privilege to be able to register your application. So first open a command line prompt with administrator privilege by right clicking on the command prompt shortcut and select “Run as administrator”. If asked, confirm. Then at the command prompt type de fill path name for your application between double quotes and add “/REGSERVER”. On my system, this gives:
 
      “D:\Delphi\BlogArticle\Office\Word To Delphi\Win32\Debug\DelphiApp.exe” /REGSERVER
 
Nothing happens on screen and you get back the command prompt almost immediately. Now DelphiApp is registered and can be used from any other application capable of accessing a COM object. And this is the case for Microsoft Office applications using VBA.
 

Writing a VBA macro to call DelphiApp

 
We need to write VBA code in Word. For that purpose, we have to make the “Developer” ribbon page available: right click on the ribbon where there is nothing and click “Customize the ribbon”. On the right list, search for “Developer” and check the checkbox, then click OK. You should now see the developer ribbon page displayed. (This may be different in older Word versions. Consult Word online help).
 
On the “Developer” tab is visible, click on “Visual Basic” button (Alt+F11). This will bring the Visual Basic IDE.
In Visual Basic for Application (VBA) you must add a reference to your automation object: click on the tools menu, then references and in the dialog box, search for your automation object and check the checkbox on the right of his name. In our case, the object is “DelphiApp”.
 
“DelphiApp” comes in that list because we registered our Delphi application. If you don’t see it, you probably forgot to register it. See the first part of this article to see which step you missed.
 
Next, you must write VBA code to call your Delphi application. Let’s enter this code in a new module associated with “Normal”. “Normal” is the template which is always used. This makes your macro available in all documents. In VBA project explorer (Ctrl+R), right click on “Normal”, and select “Insert” and then “Module”. You then see “Module1” added in the “Project Explorer” and a code window where you’ll enter your VBA instructions.
 
In the code window, you can add the following VBA code:


Once the macro is created, you may assign it to a keyboard shortcut or to a ribbon button. Let’s see how you can do that with Word 2010:
 
Right click on the ribbon where there is nothing and select “Customize ribbon” in the popup menu. You see 3 columns. Above the middle column, in the drop down list, select “Macros”. You should now see your macro “ReadDataFromDelphi”.
 
On the right side, you see all existing tabs. Click on the tab which you would like to be just on the left of the new tab. Below the list, click on the button “New tab”. This will create both a new tab and a new group. Click on the new tab. Click on the button “Rename”. Select a new name such as “DelphiApp”. Click on the new group. Click on the rename, enter a new name such as “Delphi” and select an icon.
 
Click on your macro in the middle column. Click on the button “Add” between the two right most columns. This will add your macro to the new group. Select a name such as “ReadData” and an icon.
 
Finally, click OK! You now should see the new tab “DelphiApp” with a single group “Delphi” having a single icon “ReadData”. Activate the tab and click the icon. Your Delphi program will start and display the InputQuery dialog box we programmed in Delphi.
 
My VBA code displays the value returned by DelphiApp using MsgBox. To insert the value into the document, replace the call to MsgBox by:
 
Selection.Text = Value
 
That’ it!

Suggested reading


Automate Microsoft Office from Delphi

The full article is available at
    http://francois-piette.blogspot.be/2013/01/microsoft-word-or-excel-calls-delphi.html

Follow me on Twitter

January 23, 2013

Enabling floating form designer in Delphi XE3


Delphi XE3 has an interesting feature removed from previous versions: the floating VCL form designer. You can enable it again easily, at your own risk.

While the IDE is not running, launch the registry editor, locate the key  HKEY_CURRENT_USER\Software\Embarcadero\BDS\10.0\Form Design and set the "Embedded Designer" to FALSE.

Note: Don't do that if you use FireMonkey. It's form designer doesn't work when floating.

If you need sometimes to have the floating form designer and sometimes not, you way ask the IDE to load his options from another registry key. Use the "-r MyRegKey" in a new shortcut to BDS.EXE. The first time you launch Delphi with that option, the registry key is created with a copy of the current standard key. You can then change the options without affecting the standard registry key. You can also change packages and so on.


January 21, 2013

Automate Microsoft Office from Delphi


Microsoft Office (Word, Excel and others) are applications which can be fully automated from another application. Everything you can do by hand can also be done programmatically from another application and of course from your Delphi application.

Office API and Delphi components


Microsoft Office exposes his features thru a bunch of interfaces which are made accessible thru Windows COM API.

To ease the automation, Delphi is delivered with non-visual components which are "wrapper" around the underlying COM objects and exposes the same properties, methods and events as the COM interface.

Delphi has several sets of components for working with several Office versions. There are components for Office 2000, Office XP and Office 2010. 2010 version is available from Delphi XE2. Of course there are more Office versions, but don’t worry: Microsoft has carefully made his interfaces upward compatible. For example, if you use the Office 2000 components, you can still automate all Office versions from 2000 to the latest. The only restriction is that you cannot easily use new features if you use the old component.

Actually, it is better to use the older components which are capable of doing what you need to do!

This is because the compatibility in Microsoft office API goes upward and not downward.


Making the components available


Since there are several sets of components, you must make sure the correct version is installed.

For Office 2000 and Office XP, Embarcadero provides pre-built packages. For Office 2010, Embarcadero provides the source code but no package. Don’t worry, it is easy to create the package.

To see the installed packages, launch Delphi and go to the menu / Component / Install Packages. You see a long list of all installed design time packages with a checkbox telling that the package is available or not.

Locate “Microsoft Office 2000 Sample Automation Server Wrapper Components” (Or Office XP) and check the checkbox in front of the one you plan to use. Click OK and verify that your component palette now include a tab “Servers”.

To use Office 2010 components, first uncheck both Office 2000 and Office XP component. Then create a new package: go to menu / file / new / other. On the tree, select Delphi Projects and then on the right pane double click on the package icon.

Save the package in a convenient directory, naming it “Office 2010”. Then in the project manager, right click on Office 2010 and select “Add…”. The file open dialog is showing. Navigate to the directory where Delphi is installed, probably “C:\Program Files (x86)\Embarcadero\RAD Studio\10.0” and then navigate to “OCX\Servers\pas2010”. You’ll find all the files required to support the full Office 2010 suite. You may add all files but for the purpose of this article, only Word2010, Office2010 and VBIDE2010 are strictly required.

Once the files have been added, build and install the package: Right click on Office2010 in Project Explorer and select “Build” and then “Install”. In the process, you’ll be asked to add VCL framework. Accept. Finally, you have Office 2010 components installed and ready to be used. Strangely (Probably a small bug), then components are installed in the “OfficeXP” tab in the component palette and they all have the default icon. Not really a problem.

Using Office Components


As an example, we will create a sample application to insert a sentence at the end of a Word document. This is quick and easy!

Create a new VCL forms application, drop a TWordApplication and a TButton on the form. Then add the code below as the button’s OnClick handler.

The quickest way to locate it is to enter WordApplication in the component palette search tool.

TForm1.Button1Click(Sender: TObject);
begin
  WordApplication1.Connect;
  WordApplication1.Visible := TRUE;
  WordApplication1.Selection.EndOf(wdStory, wdMove);
  WordApplication1.Selection.Text := 'Delphi Rocks !' + #13;
  WordApplication1.Selection.EndOf(wdStory, wdMove);
  WordApplication1.Disconnect;
end;

Compile and run the application. Start Word, making both Word visible and your application. Click the button and see a line is added at the end of the Word document. Magic! You see that your Delphi application is automating Word.

To understand all the features you can do with Word automation, you must consult Microsoft documentation. Unfortunately, this documentation is written for Visual Basic. Don’t worry, whatever the language is, the object model, the functions and properties do not vary. This is only a matter of syntax. The above Delphi code is inspired from sample code provided by Microsoft.

This article is available at:
     http://francois-piette.blogspot.be/2013/01/automate-microsoft-office-from-delphi.html

Update: Delphi XE4 MS-Office components article

Follow me on Twitter
Follow me on LinkedIn
Follow me on Google+
Visit my website: http://www.overbyte.be